How to Upload Multiple Screenshots as One in Imgur
If you are looking for a powerful tool to capture screenshots for your online form then GreenShot is ane of the all-time available. I volition show you how to take reward of its helpful functions.
To use GreenShot you lot have to perform the following steps:
- Understand The Basics
- Setup The Application
- Download Installer
- Install The Software
- Configure The Application
- Capture Your Screen
- Edit The Prototype
- Consign It
- Setup Multiple Captures
- Using Captures For Documents
- Speeding Upwards Your Piece of work
Now that you know which are the exact steps of using GreenShot let's accept an in-depth look at each 1 of information technology.
Step 1 – Understand The Basics
GreenShot is one of the near popular screen capture tools. When it was starting time launched, information technology was only compatible with Windows OS (Operating Arrangement). After some time (in 2017, to exist more specific), a MAC GreenShot version was released. It featured the exact aforementioned functions as the initial one.
Being an open-source tool means that anyone tin download, install, and utilise it without paying whatsoever subscription fee. If you are planning on using information technology on MAC devices then you will have to pay a one-time fee. At the moment, to download the MAC version of GreenShot users must pay $one.99. It is non much just it allows the software developers to comprehend their expenses.
The awarding is capable of capturing high-quality images of your screen. It also comes with a built-in image editor that allows you to make necessary adjustments. We will talk over after the actual functions of the paradigm editor.
Step two – Setup The Awarding
This is the first actual step you lot need to perform in club to utilise GreenShot. I accept divided it into two smaller steps and then that it will be easier for yous to understand the verbal activities.
Step ii.one – Download Installer
The installation kit can be easily downloaded from the GreenShot official website. To do so, you have to follow a set of 4 uncomplicated steps:
- Become To GreenShot.org
- Click On The Downloads Button
- Choose Your OS
- Press The Advisable Download Push
Get To GreenShot.org
This one is clear enough and does not need any further instructions.
Click On The Downloads Button
The Downloads button is placed in the menu at the peak of the page.

Choose Your Os
Yous volition accept to cull between Windows and MAC.
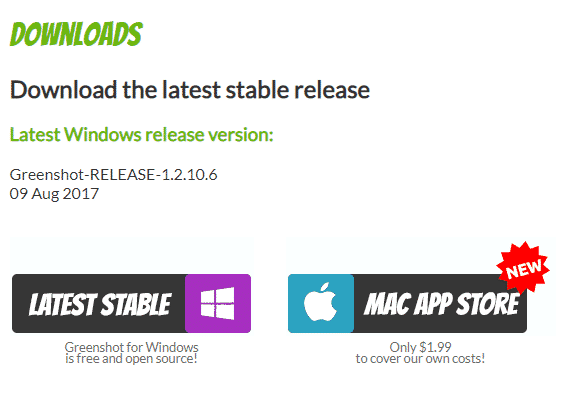
Press The Appropriate Download Push
After determining the operating arrangement you are running you will have to click on the appropriate button. The Windows button will beginning the downloading of the installer. The MAC button volition take you to the GreenShot application in the Apple Store.
Pace 2.2 – Install The Software
Depending on the operating organization yous accept called, the installation process will require you lot to perform dissimilar steps. I volition testify you what steps are necessary to install the application on both platforms.
Windows
To install GreenShot on Windows you take to:
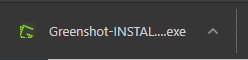
- Salve the Installer by clicking Keep as per the paradigm below on the bar at the bottom of your browser

ii. Run the executable by clicking on its proper name when it has finished downloading
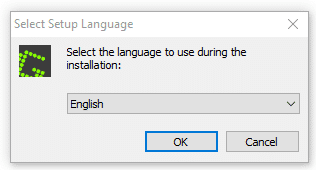
3. Choose the desired linguistic communication
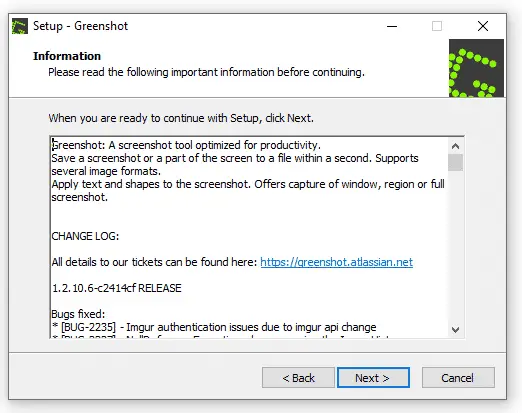
4. Advisedly read the license agreement and take it.

5. Read the ChangeLog and click Side by side.
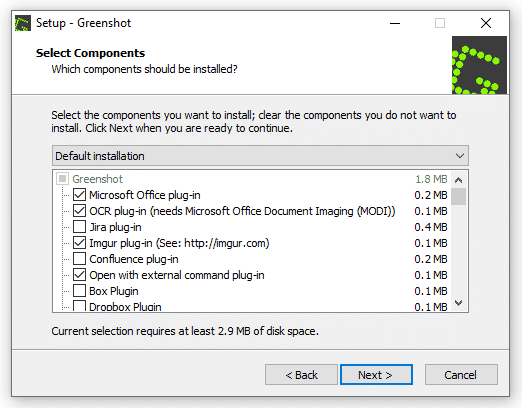
vi. Define the additional tools you desire to install.
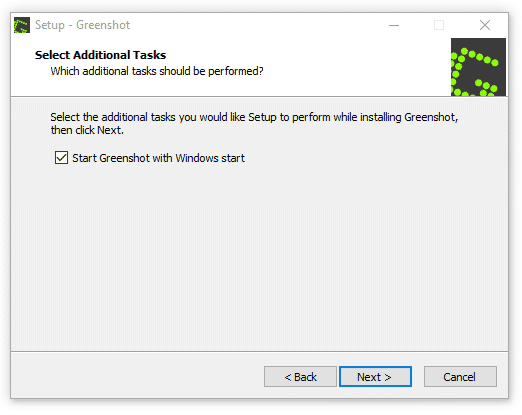
7. Choose whether GreenShot should start every time you turn on your computer.
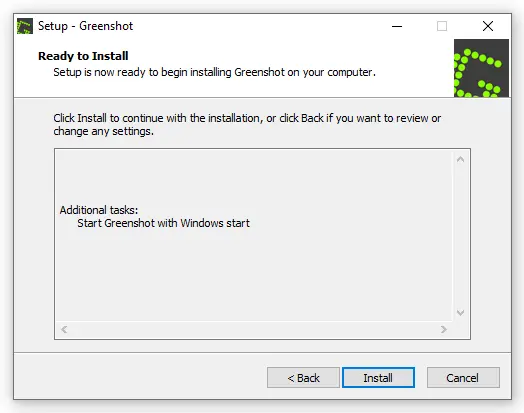
8. Review the installation details and press Next.
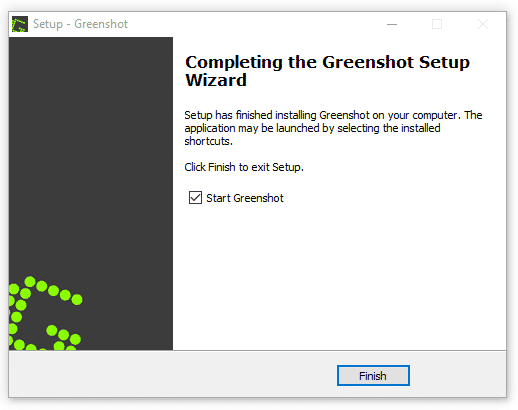
9. Wait a couple of minutes for the software to install, and so click Finish.
MAC Os
If you lot are planning on using the MAC version of GreenShot and then you will take to perform the following steps:
- Go to GreenShot (Apple tree Store)
- Click on the Install push button
- Fill in the payment information
- Confirm the installation
- Wait a couple of minutes for the installation to complete.
Pace 3 – Configure The Awarding
Before proceeding to actually capture screenshots you need to properly configure GreenShot. To access the Settings dialog y'all accept to:
- Run GreenShot
- Right-click the GreenShot icon in the tray

3. Printing the Preferences push button
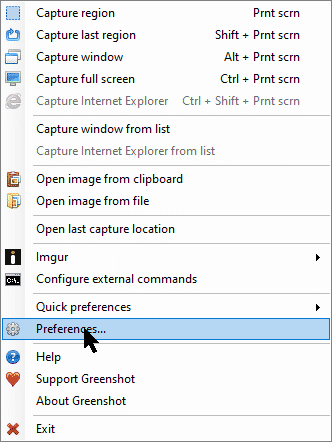
Permit's see which are the settings you can configure using the Preferences dialog.
General Settings
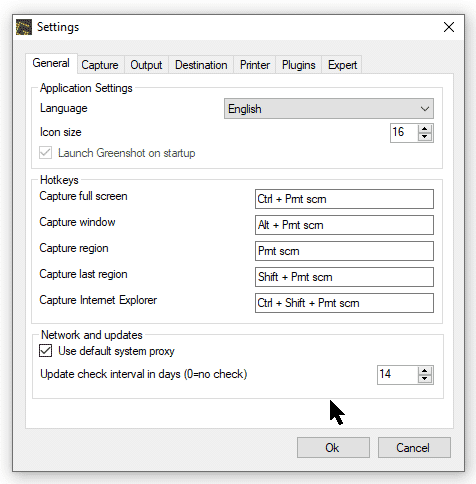
| Setting | Description | By Default | Ascertainment |
| Language | The language of the interface | English | DeutschEnglishNetherlands |
| Icon Size | The size of the tray icon | 16 | The dimension is in pixels |
| Hotkeys | Hotkeys for the most ordinarily used deportment | Ctrl + Prnt ScrnAlt + Prnt ScrnPrnt ScrnShift + Prnt ScrnCtrl + Shift + Prnt Scrn | Full ScreenWindowRegionLast RegionInternet Explorer |
| Proxy | Whether to use a proxy or non when uploading files | Enabled | Hide your real IP (cyberspace protocol) from the hosting service |
| Update Check | The interval between update checks | 14 | days |
Capture Settings
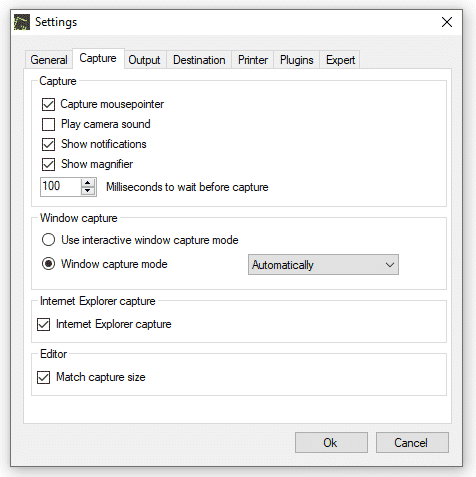
| Setting | Clarification | By Default | Observations |
| Capture Mouse Pointer | Make mouse arrow visible in screenshots | Enabled | none |
| Play Camera Sound | Play a shutter sound when you capture a screenshot | Disabled | none |
| Show Notifications | Testify notification when an action is performed | Enabled | Notifications volition be shown for plenty of activities (e.thousand. capture, save, upload, edit) |
| Show Magnifier | Show a magnifier to determine the margins of your screenshots | Enabled | It proves to be very helpful, especially when y'all demand accurate screenshots of a sure window |
| Ms earlier capture | The interval betwixt cardinal pressing and the bodily capture | 100 | Take into account that the window may modify its content within the specified interval |
| Window Capture | Desired window capture technique | Window Capture Mode – Automatically | none |
| Internet Explorer Capture | Let GreenShot to capture Cyberspace Explorer | Enabled | none |
| Match Capture Size | Make the image editor to match the screenshot size | Enabled | It is easier to work with the image editor when it features the same size equally the screenshot. |
Output Settings
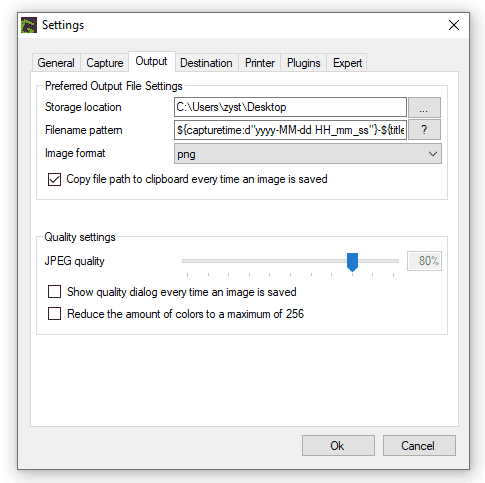
| Setting | Description | By Default | Observations |
| Storage Location | The location where all the screenshots are saved. | C:\Users\user\Desktop | You lot can ready your preferred 1. |
| Filename Pattern | Apply a specific design to rename all the files | ${capturetime:d"yyyy-MM-dd HH_mm_ss"}-${title} | Best leave by default. |
| Prototype Format | What graphic format to use when saving captures | PNG | BMPGIFJPGPNGTIFFGREENSHOTICO |
| Re-create file path to clipboard | Automatically copy the file path to your digital clipboard | Enabled | none |
| JPEG Quality | Set up a specific image quality | 80% | Can not be modified from this dialog box |
| Prove quality dialog | Show the quality dialog every fourth dimension yous capture a screenshot | Disabled | none |
| Reduce the number of colors | Reduce the number of colors to a maximum of 256 to heighten the processing speed | Disabled | Higher processing speed results in lower epitome quality. |
Destination Settings
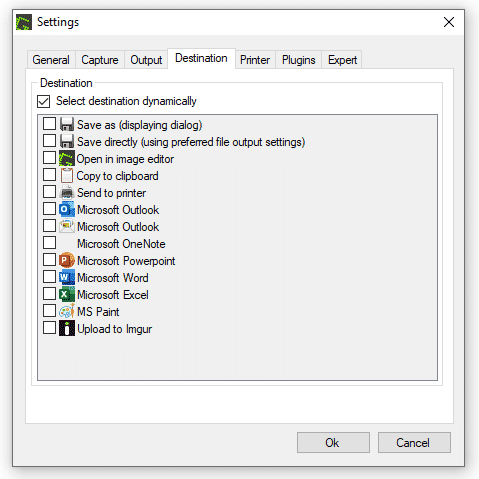
You can ready the desired destination for all the screenshots you capture. It is best to leave Select Destination Dynamically enabled. This way, you will be prompted to select a destination every time you lot capture a screenshot.
Printer Settings
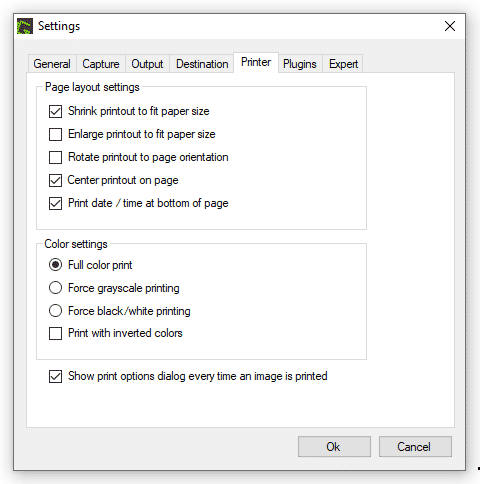
| Setting | Description | Past Default | Observations |
| Shrink printout | If larger, compress the printout to fit paper size | Enabled | May bear upon image quality |
| Enlarge printout | If smaller, enlarge the printout to fit the paper size | Disabled | May affect epitome quality |
| Rotate printout | Rotate the printout in accordance with your newspaper | Disabled | Best to enable |
| Centre | Heart the printout on the paper | Enabled | Best to leave enabled |
| Print date/time | Impress a timestamp t the bottom of the paper (date + time) | Enabled | Helps you lot determine when the screenshot was taken / printed |
| Colour Settings | Cull what colors to use when printing | Full Color | If you want to set-it-and-forget-it, ready information technology to Full Colour |
| Show print dialog options | Show options every time you print a screenshot | Enabled | It is best to go out it enabled and so that you volition be prompted to make necessary adjustments every time you impress a screenshot. |
Plugins
Using this dialog y'all can configure the additional plugins. In that location are enough of plugins that make Greenshot compatible with other software tools.
Expert
I suggest non getting into this tab considering if you practise non know what exactly you are doing yous might mess upwardly the entire configuration. Make certain y'all understand all the included functions before making any changes to the Expert tab.
Pace 4 – Capture Your Screen
After you cease configuring the tool y'all can offset capturing screenshots. To exercise so y'all tin either press the Prnt Scrn key or right-click the Greenshot tool and select Capture. Depending on the portion of the screen you want to capture you can select 1 of the five available options:
- Specific Region
- Last Region
- Full Screen
- Window
- Internet Explorer
Specific Region
You tin can select a specific region of your screen to be captured. To do then you have to press the Prnt Scrn key and brand utilise of your mouse / touchpad to select the desired area. If you decide to capture a screenshot of a certain window you can apply the Spacebar to switch between Region and Window mode.
To move the margins of the screenshot you lot tin can either take reward of the arrows on your keyboard or of the Ctrl + Pointer. The latter will motility the margins by 10 pixels, whereas the first option volition move them by 1 pixel at a time. If you are not happy with the selection, you lot can click the Render button to opposite to the initially selected area.
Another great hotkey is the Magnifying Drinking glass (press Z to activate). Information technology allows you to make necessary adjustments and capture the perfect screenshot.
Final Region
This option allows yous to capture again the terminal region you have selected. For instance, if you accept a screenshot of a certain window, by using the Last Region pick you can capture another screenshot of the same window. The associated hotkey is Shift + Prnt Scrn.
Full Screen
If yous want to capture your entire screen, all yous have to do is to printing the appropriate hotkey (Ctrl + Prnt Scrn) or select the Capture Total-Screen pick.
Window
Just like the to a higher place-mentioned specific region, you tin capture a screenshot of a certain window. To exercise so you volition have to press Alt + Prnt Scrn. The selected window will be highlighted. Y'all can switch between the bachelor windows using your mouse buttons.
Internet Explorer
This option is relevant when you capture a screenshot of a specific website that is opened using the Net Explorer browser. By pressing Ctrl + Shift + Prnt Scrn you can take a screenshot of the webpage that is currently opened.
Pace 5 – Edit The Prototype
Later on capturing the desired screenshot it is time to edit the image so that your students will be able to easily empathize it. The integrated graphic editor allows you to highlight certain portions of the screenshot, add together text, and even depict custom shapes.
Let'due south see which are the nigh ordinarily used functions of the Greenshot built-in image editor.
Shapes Drawing
Using the drawing toolbox yous can easily draw shapes. You can utilise one of the pre-defined shapes that can exist selected using a hotkey, such equally:
- Rectangle
- Elipse
- Line
- Arrow
If you lot want to draw a custom shape for your screenshot, you can take reward of the freehand line drawing using the F fundamental. In that location are plenty of additional tools that yous tin can make use of when drawing shapes. Below I have listed the virtually of import of them.
| Office | Hotkey |
| Rectangle | R |
| Elipse | Due east |
| Line | 50 |
| Pointer | A |
| Move Element | Arrows + Shift |
| Select Multiple Elements | Shift |
| Resize Element | Shift + Left-Click |
| Anchor an Object | Ctrl |
| Freehand Drawing | F |
| Exit Editor | Esc |
Add Text
Yous tin apply the Text Tool (press T) to add together labels to your screenshot. This has multiple uses when didactics online. For example, you can point out unlike aspects of a specific portion of code. You tin can easily change the font, the colour, and many other aspects regarding your text (eastward.g. bold, italic, underlined, etc.).
- To add a new line press Shift + Enter or Shift + Return.
- To select the entire text press Ctrl + A
- To delete the previous word press Ctrl + BackSpace
- To marking the text as Ready printing Enter
Highlight
Take advantage of the Highlight Tool to draw your students' attention to a certain portion of your screenshot. To enable this tool you take to printing H and then select i of the bachelor working modes. There are 4 different highlighting methods:
- Highlight Text – apply a bright colour to the selected text
- Highlight Area – increment the effulgence of the selected area and blur the residue of the screenshot
- Grayscale – only the selected area remains normal while the rest turns into grayscale (blackness and white)
- Magnify – add a magnification result to the selected area
Hide Sure Portions
If your screenshot includes sensitive information (such as phone numbers, depository financial institution accounts, etc.) y'all tin can make utilize of the blurring functions available in the Greenshot toolkit. You can choose between two obfuscating methods:
- Pixel – increases the pixel size in the selected area
- Blur – decreases the clarity of the selected surface area
To enable this tool you have to press O.
Adjust The Size (Crop)
Using the integrated image editor yous tin easily crop your screenshots. Printing C to enable the cropping tool. You will be able to decrease both the width and elevation of your image while maintaining the resolution and DPI (dots-per-inch).
If you press Shift and + button at the same time y'all volition enlarge the screenshot by 25 pixels in all 4 directions.
Add Pictures
You tin can add together another image (Motion picture-In-Picture) by dragging the new paradigm into the Greenshot editor. This volition overlap the 2 graphics and so you tin can adjust the cropping, placing, and other key aspects.
Stride vi – Consign It
After yous finish editing your screenshot it is time to export it. To practice and then, click the File button and select ane of the available exporting options.

The first ii options will save your screenshot on your device'due south storage. Salve as displays a new window that allows yous to select the desired place where to store the screenshot. Save directly will utilize the predetermined storage space to save the image. Yous can consign the screenshot in one of the post-obit file types:
- PNG
- BMP
- GIF
- JPG
- TIFF
- GREENSHOT
- ICO
Copy to clipboard allows you to Copy and Paste your screenshot into plenty of applications. For example, you lot tin can open up Google Docs and printing Ctrl + V to paste the screenshot directly. This skips the saving process and allows you to upload the file faster into the text document.
Every bit you would expect, pressing Ctrl + P volition send your screenshot to the printer. A new dialog box will pop-up and you lot tin can adjust certain settings for the printed version (e.one thousand. landscape/portrait, color/grayscale, etc.)
The adjacent iv options allow you to export the processed screenshot into one of the supported Microsoft tools. These tools include:
- MS Outlook (Email)
- MS Powerpoint (Graphic Presentations)
- MS Give-and-take (Text Editor)
- MS Excel (Spreadsheet Editor)
- MS Paint (Uncomplicated Graphic Editor)
Final but not least, you can upload your screenshot directly to Imgur. This way you volition exist able to share it with your students using the unique link that is generated. Make certain to connect your Imgur account to the Greenshot tool so that it will exist uploaded under your name.
Greenshot Alternatives
There are enough of screenshot capturing tools available on the market. The virtually popular are:
- Lightshot
- SnagIt
- Windows Snipping Tool
How To Set Upwards Multiple Captures
If you take a set of captures that y'all want to apply together then you have a few options to choose from. The most commonly used possibilities are:
- Making a Collage
- Creating a Slideshow
Making a Collage
If you are planning on creating a collage using the previously-captured screenshots and so you can take advantage of heaps of collage-making tools. Nearly of them are available for gratis, while several do not require you to install any third-party application (online-based collage-making tools).
The most commonly used collage-making applications are:
- Online
- BeFunky Collage Maker
- Adobe Spark Photograph Collages
- Online Photo Collage
- Fotor Photo Editor
- Offline
- Adobe Photoshop
- CollageIT
- PixTeller
- PiCollage
Creating a Slideshow
If you want to turn the screenshots into a video that guides your students then you might desire to consider creating a slideshow. You tin can take advantage of plenty of slideshow-creating applications. If you are using a Windows-based device then y'all tin can fifty-fifty use the pre-installed Windows Movie Maker video editing tool. Simply add the photos into the timeline and export it as a video.
Other slideshow-creating tools include:
- Online
- Adobe Spark Slideshow Creator
- Render Woods Slideshow Maker
- Kapwing Online Slideshow Maker
- Offline
- Windows Pic Maker
- TechSmith Camtasia Studio
- Sony Vegas (Pro)
Using Captures For Documents
If you accept a serial of screenshots of a certain process then y'all can put them in a document and add text in betwixt them. This way you volition be able to guide your students throughout certain processes. For example, you tin can accept advantage of screenshots to provide your students with technical back up.
To do so set a text document that contains instructions and demonstrations on how to use the software tools required during classes. If y'all are using Google Meet to comport alive meetings during your online course then you can provide your students with a transmission including simple instructions on how to make use of the available functions. The topics can include:
- How to brand certain your audio-video equipment is prepare for classes
- How to log in Google Encounter
- What to exercise when the connection fails
- How to conform the quality of your video
Y'all can use your screenshot for diverse purposes. For instance, you can create tutorials, grooming manuals, or even user manuals. It is up to your creativity.
Speeding Up Your Work
It is up to you how you are going to take advantage of screenshots. When it comes to inserting your screenshots into documents, at that place are two feasible options:
- Copy From Clipboard
- Save and Insert Manually
The first choice is way faster than the latter. This happens because it only requires you to press ii keys on your keyboard and your screenshot is inserted into your document. To exercise and then you have to select the Copy to clipboard (Ctrl + C) function after capturing your screenshot.
Subsequently this, go to your document, click the exact spot where you want to insert the paradigm, and press Ctrl + V (Shortcut for Paste). The paradigm will be instantly pasted into your text document without having to previously save it on your storage and and so upload it.
The other option requires a little fleck more than time. It is feasible for those who want to separately proceed all the captured screenshots for other purposes. Perchance you will use it in a slideshow, an animation, or as a reference for farther classes. Regardless of your reason, you volition have to click on the Relieve As button and select the destination path for your screenshot.
So open your text editor and select the appropriate push button for inserting a picture. Navigate throughout your storage and select the previously-captured screenshot. Click on the Open (or similar) button and you got your screenshot inserted in the text document.
Accept Reward Of The Bachelor Hotkeys
Using keyboard shortcuts saves a lot of fourth dimension, regardless of the activity you perform. Especially when capturing multiple screenshots information technology is a great thought to make use of the available hotkeys. If you tin can not call up the verbal gild of shortcuts y'all might want to customize them. To do so, perform the following steps:
- Open up Greenshot
- Right-click on the icon in the system tray
- Click on the Settings push
- Navigate to the General tab
- Ready your desired hotkeys
My personal recommendations in terms of screenshots are:
- Capture Full Screen – F2
- Capture Window – F4
- Capture Region – F3
- Capture Last Region – F5
- Capture Internet Explorer – F6 (not ordinarily used)
Make certain those hotkeys do non interfere with any of the predetermined hotkeys of the software tools you lot are using during your grade. If there are any interferences and then the Greenshot awarding volition non allow you to gear up a certain shortcut and inform you that information technology is already used.
For example, I tin can not use the F1 central for Capture Full Screen due to the fact that near Windows applications have this key already assigned for the Help function.
Quick Screenshot Setup
When you have to have screenshots in a repetitive manner you volition definitely observe that manually saving all the images is quite a time-consuming activity. To significantly reduce the time y'all spend dynamically setting the destination path for each screenshot I have prepared a Quick Screenshot Setup for your convenience.
- Open Greenshot
- Correct-click the icon in the system tray
- Printing the Settings push button
- Navigate to the Destination tab
- Uncheck Select Destination Dynamically
- Navigate to the Output tab
- Set the desired destination path (I suggest selecting a folder on Desktop so that it will be easier to observe)
- Press the Apply button
- Shut the Settings dialog box
- Test your brand new Quick Screenshot
From now on, every fourth dimension you use one of the previously-configured hotkeys to capture a screenshot information technology volition be automatically saved to your desired destination path. This saves y'all plenty of time, especially when y'all take an increased number of screenshots for similar activities.
For example, when you create a tutorial about how to apply the epitome editing functions available in the Photoshop toolkit yous might want to use this Quick Screenshot Setup to rapidly take screenshots of the Main Carte and all the associated features.
Source: https://www.masterteachingonline.com/how-to-use-greenshot/
0 Response to "How to Upload Multiple Screenshots as One in Imgur"
Post a Comment